 DAELink
An alternative to Dynamic Link connecting DaVinci Resolve and After Effects
Adobe After Effects CC 2025+ | DaVinci Resolve Studio v20+ (or Free v19.0.3)
Key Features
Composition Linking
Bidirectional links between AE comps and DaVinci timeline nests
Smart Render Management
Render in one click from After Effects with templates, then refresh renders in DaVinci in one click
Shared Markers
Share editorial notes, animation timing marks, and comments between apps as native composition and timeline markers
Layer Transfer
Send video, audio, and image layers from DaVinci timelines to your AE project in a new comp
Live Link
Jump straight from a DaVinci timeline clip to the exact linked composition in After Effects
Project Organisation
Each project gets its own folder on disk with auto-organised bins in both apps
User Interface
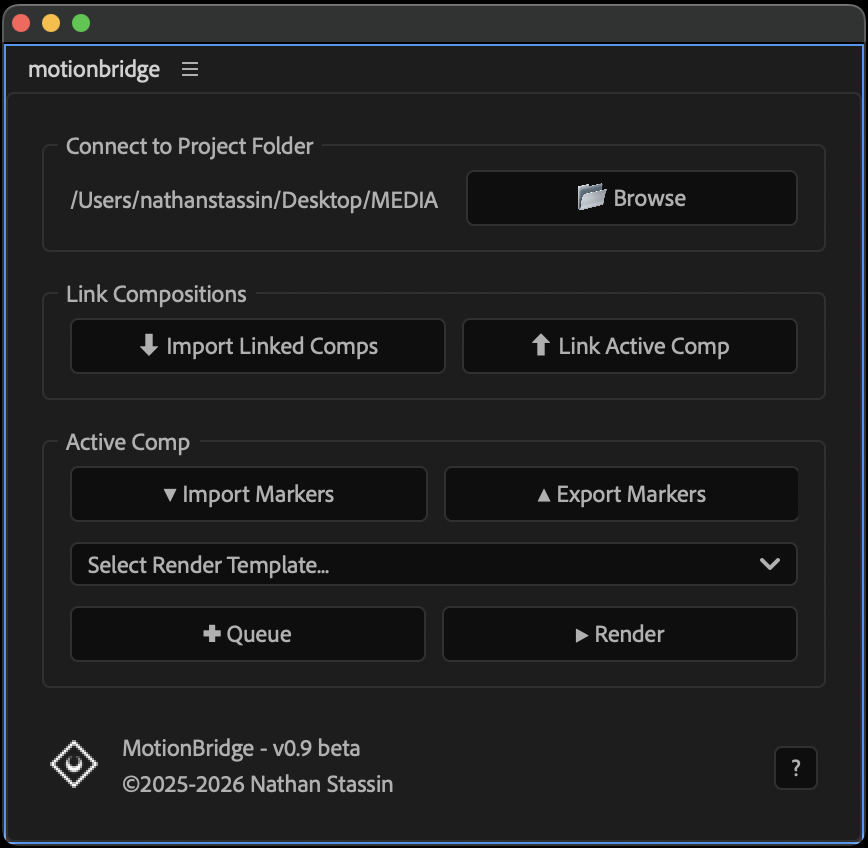
After Effects Panel
Dockable ScriptUI panel with all essential controls for linking, markers, and rendering.
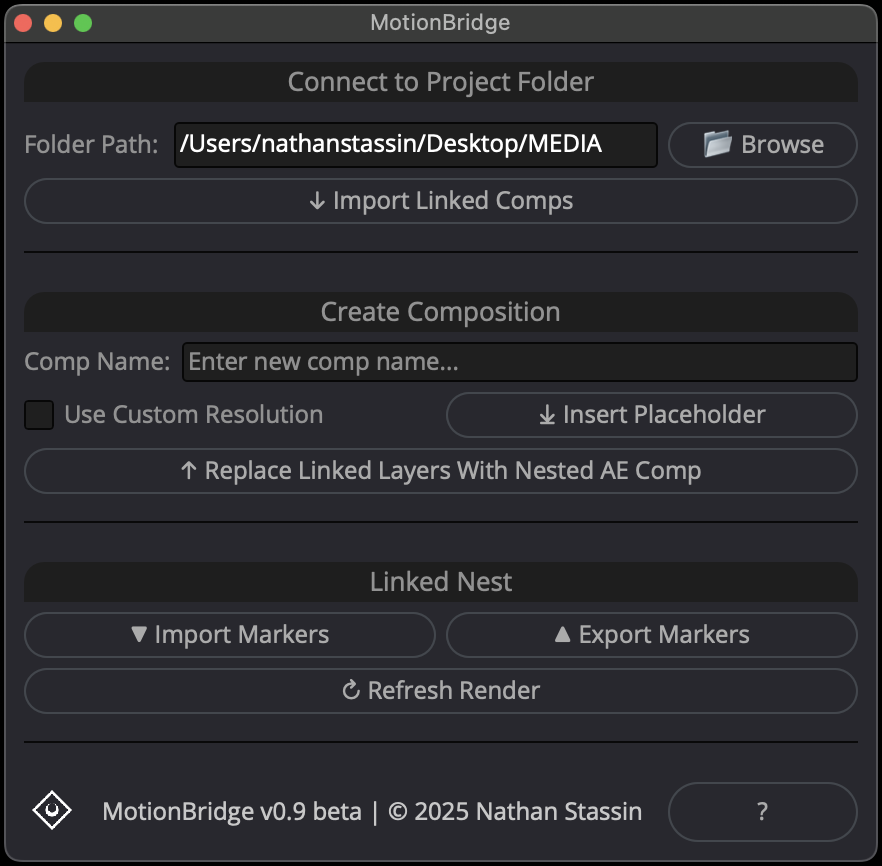
DaVinci Resolve Panel
Matching interface design with mirrored functionality for seamless cross-application workflow.
Installation
After Effects Script
- Download
daelink.jsxfrom the GitHub repository -
Navigate to your After Effects ScriptUI Panels folder:
- macOS:
/Applications/Adobe After Effects [version]/Scripts/ScriptUI Panels/ - Windows:
C:\Program Files\Adobe\Adobe After Effects [version]\Support Files\Scripts\ScriptUI Panels\
- macOS:
- Copy
daelink.jsxto the ScriptUI Panels folder -
Ensure script permissions are enabled:
- Go to After Effects > Settings > Scripting & Expressions
- Check "Allow Scripts to Write Files and Access Network"
- Click OK
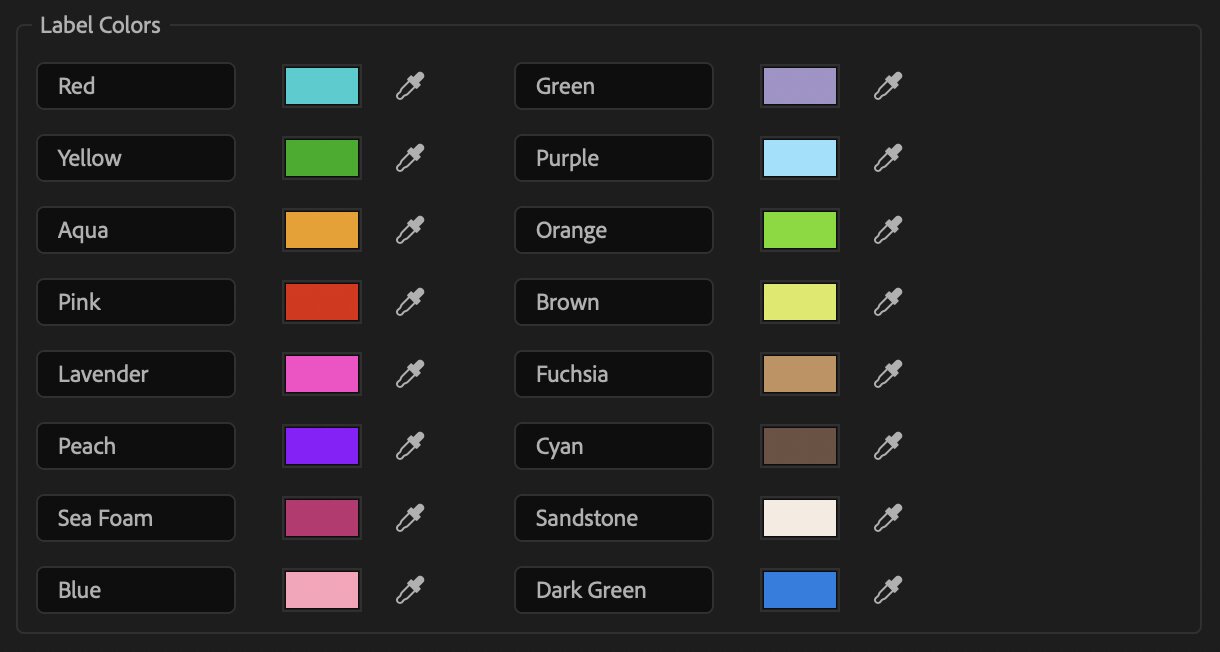
- Optional but helpful: change label colors to match DaVinci
- Go to After Effects > Settings > Labels
- Using color pickers with screenshot, match Label Colors to the below:
- Click OK
- Restart After Effects
- Access via: Window > daelink.jsx
DaVinci Resolve Script
- Download
daelink.luafrom the GitHub repository -
Navigate to your DaVinci Resolve Scripts folder:
- macOS:
~/Library/Application Support/Blackmagic Design/DaVinci Resolve/Fusion/Scripts/Utility/ - Windows:
%APPDATA%\Blackmagic Design\DaVinci Resolve\Support\Fusion\Scripts\Utility\
- macOS:
- Copy
daelink.luato the Utility folder - Restart DaVinci Resolve
- Access via: Workspace > Scripts > daelink
How to Use
Getting Started
- Open DAELink in Resolve first to initialise the project
- Click 📁 and navigate to the current project's MEDIA folder
-
Each project creates its own daelink folder with subfolders:
- Renders: All renders from After Effects
- Support: JSON file (daelink.json) containing link data
- Both panels remember the folder per project, so later launches reconnect automatically
Opening After Effects from DaVinci:
- Click the AE button in the bottom-right of the DaVinci panel
- If a project is linked, it opens the exact
.aepfile directly in After Effects - If no project is linked yet, it launches After Effects on its own so you can connect from the DAELink panel there
Linking Compositions ↑ | ↓
From DaVinci to After Effects:
- In DaVinci, click ⤓ Insert Placeholder where you want the composition to start
-
Link video, audio, and/or image media clips from timeline to the placeholder clip
- (Select Clips > R-click > Link Clips)
- Please note:
- Best used for layer timing; carry out all design and animation in AE
- Layer transforms may not always transfer predictably
- Keyframes will not be transferred
- Only clips with a file on disk can transfer. Generators, titles, compound clips and Fusion compositions exist only inside DaVinci, so DAELink names them and stops before changing anything
- Click ↑ Make AE Comp From Placeholder to convert the placeholder into a nested timeline
-
After Effects opens your linked project and creates the comp automatically
- If the comp doesn't arrive (for example, no AE project saved and linked yet, or a different project open), click ↓ Import Linked Comps in After Effects
From After Effects to DaVinci:
- In After Effects, open your composition to make it active
- Click ↑ Link Active Comp to establish the link
- Switch to DaVinci Resolve
- Click ↓ Import Linked Comps to finalise the link
Render Management ✚ | ▶ | ↻
In After Effects:
- Select your desired render template from the dropdown (create custom templates in the Render Queue window)
- Click ✚ Queue to add the active composition to the render queue
-
Or Click ▶ Render to queue and immediately render
- (NB: this will also render any other queued comps)
- Renders automatically save to the Renders folder in your daelink project folder
In DaVinci Resolve:
- After rendering in After Effects, return to DaVinci
- Click ↻ Refresh Render to update the timeline nest with the latest render
- Works inside the timeline nest,
- Or with the playhead over nested timeline clip
Marker Synchronisation ▲ | ▼
From DaVinci to After Effects:
- Add markers:
- Inside your DaVinci nested timeline,
- Or on the nested timeline clip in your working timeline
- Click ▲ Export Markers in DaVinci, with playhead over clip
- Switch to After Effects, open the linked comp
- Click ▼ Import Markers to apply them as composition markers on the active comp
From After Effects to DaVinci:
- Add composition markers to your linked comp (Composition > Add Marker, or shortcut * on the numpad with no layer selected)
- Click ▲ Export Markers in After Effects
- Switch to DaVinci Resolve
- Click ▼ Import Markers to update your timeline or timeline nest clip
Known Limitations
- DaVinci Resolve Studio Requirement: Fusion UI was removed from free tier after V19.1, so to use without Studio download DaVinci Resolve V19.0.3
- Image transforms: After Effects and DaVinci transform images differently; best used for layer timing - position, scale, and rotate in After Effects
- No keyframe transfer: Carry out all animation work in After Effects
- Frame rate consistency: Always maintain the same frame rate throughout all linked comps in a project (DaVinci Resolve is not flexible with frame rate changes)
- If needed for a specific comp, precomp in AE: for example a 12fps precomp in a 24fps linked comp
- No retime transfer: Speed changes, reverses and freeze frames can't be carried into After Effects. DAELink warns you and names the retimed clips before creating the comp, and those layers transfer at 100% speed
- On DaVinci Resolve 21.1+ the clip speed is read exactly; on earlier versions it is estimated, so the warning can occasionally flag a clip that wasn't retimed
- Workaround: reset the clip to 100% speed, or render the retimed clip out and link the rendered result instead
Ongoing Development
Roadmap
July - December 2025: Concept
- Months of brainstorming and experimentation, originally under the name MotionBridge
January - August 2026: First Beta
- Small group of beta testers test the workflow on real world projects
September 2026: DAELink V0.9 Beta
- Renamed from MotionBridge to DAELink, with safer project files and automatic reconnection in both apps
- Drop-frame timecode and fractional frame rates (23.976, 29.97, 59.94) handled correctly
2026: V1.0 Stable
- Refinements based on beta feedback
Near Future: Collaboration Features
- H.265 with Alpha proxy generation for BlackMagic Cloud users
- Requires DaVinci Resolve Scripting API update
Ready to Streamline Your Workflow?
DAELink is free and open source
Licensed under GNU GPL v3.0 • Free for personal and commercial use
Share Your Feedback
Found a bug, have a feature request, or just want to say what's working well?